![]() FaceTime is a videotelephony application that was developed by Apple Inc. So far this program is available on all devices running on iOS or Mac OS. By using this app, users can make a video call any where across the globe as long as there is an internet connection. This program is becoming popular these days, since this app is reliable, fast, free of charge, and is very easy to use. Moreover, capturing screenshot on FaceTime is important since this allows users to keep a copy of a certain FaceTime conversation, which they can use for documentations or sharing it to friends online. To take screenshot on FaceTime, a brief discussion will provided throughout the post.
FaceTime is a videotelephony application that was developed by Apple Inc. So far this program is available on all devices running on iOS or Mac OS. By using this app, users can make a video call any where across the globe as long as there is an internet connection. This program is becoming popular these days, since this app is reliable, fast, free of charge, and is very easy to use. Moreover, capturing screenshot on FaceTime is important since this allows users to keep a copy of a certain FaceTime conversation, which they can use for documentations or sharing it to friends online. To take screenshot on FaceTime, a brief discussion will provided throughout the post.
Top FaceTime screenshot for OS X
Recommended solution – Apowersoft Mac Screenshot
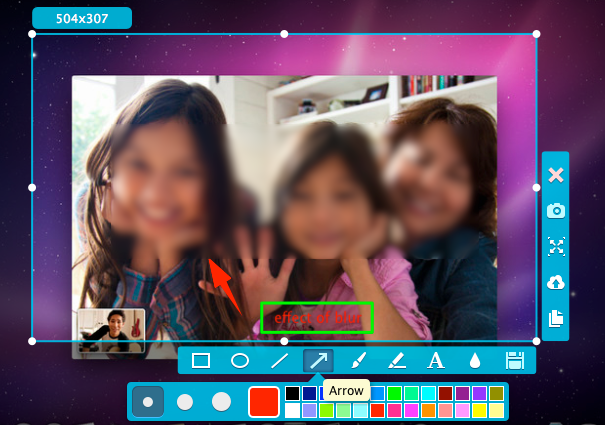
In taking FaceTime screenshot, it is advisable to use a full-fledge screen capture tool for Mac OS X called Apowersoft Mac Screenshot. This program is specifically designed to run well with every Mac devices, at the same time having the feel of a default Mac program. Moreover, this screen cap tool has other interesting function aside from taking FaceTime snapshot, which includes: a built-in image editor for adding annotations, and a picture uploader, which is helpful in sharing images to your friends online instantly.
Here are the steps to capture screenshot using Apowersoft Mac Screenshot. Download and install the app, by clicking the download button below.
- Once installed, established a FaceTime connection.
- Now open this screen grab application, then go to “Options”, and select a keyboard shortcut that you want to use.
- In order to take screenshot, simply hit the keyboard shortcut that you just set.
- This will trigger the cross-hair, next is to drag it along the portion to capture and release the mouse.
- A picture preview, along with an image editor will appear. From here you can add basic annotations.
- To save the captured screenshot on local disk, just click the diskette like icon.

Aside from using this tool, you can also use the alterative way in capturing FaceTime snapshot. However, the alternative way is not that simple to use and functional as the recommended way, but it can works fair enough take FaceTime screen.
Alternative solution – Lightshot
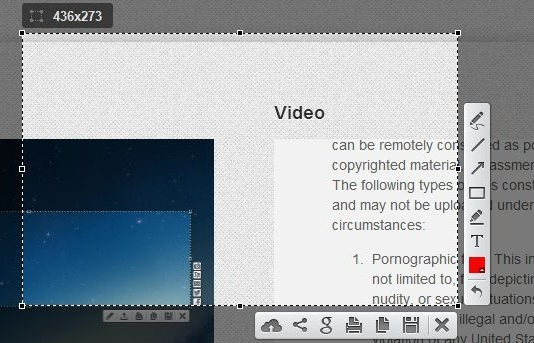
If you’re looking for an alternative way to screenshot FaceTime, then Lightshot is the app that you can use. This is a popular browser plug-in tool that is now available for Mac users. By using this program, every user can capture FaceTime with few clicks. Other than taking screenshot, adding annotations, and image sharing are also enabled in this solution.

On the other hand, this program has some glitch on its system, since it is now specifically made for Mac OS. So expect some crashes, and unresponsiveness. Unlike the recommended way that is meticulously designed to fit Mac operating system. Plus, its image uploading function is quite slow, but is fair enough if you can stand to wait.
In an event that you are using a device running with an iOS, then you can take screenshot in FaceTime using the various ways to screenshot on iOS.
Top FaceTime screenshot solution for iOS
Recommended way
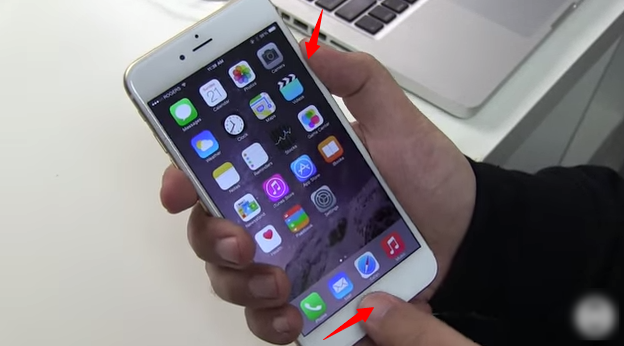
If you’re using an iOS device, the most recommended way to capture FaceTime screen is by using its default print screen configuration. There’s no need for any added application, just make a FaceTime call with your family or friends, then press the “Home” and “Sleep/Wake” button at the same time. You can then view the captured screenshot under your Picture Gallery.

This method is convenient to use, however, its function is limited and pressing multiple buttons is not responsive at times. In this case, you can use your device’s Assistive Touch to take screenshot.
Alternative way
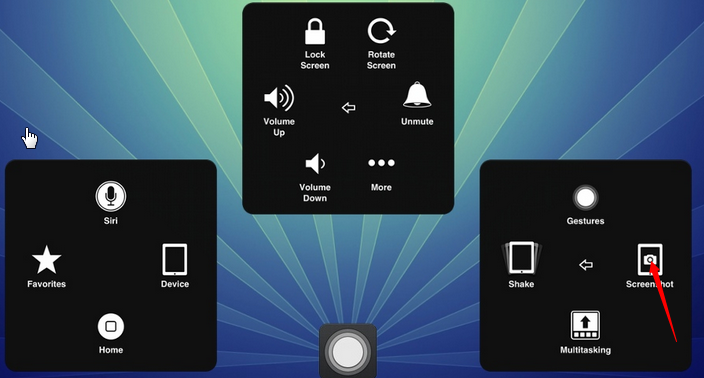
To avoid pressing numerous buttons just to take screenshot, then you can use the Assistive Touch function as an alternative. This function is created as a backup in case the device’s “Home” button is not functioning. Moreover, it is also created to take screenshot easily. Now in capturing FaceTime screen with this solution you must, go to “Settings”, then tap “General”, and enable the “Assistive Touch”. In order to take screenshot, tap “Assistive Touch”, and then hit “Take Screenshot”.

Unlike the former method, this way is easier to do since tapping is easier that pressing key combinations.Plus, there’s a lot of other features that can be accessed from it.
Conclusion
These are the various ways to capture snapshot on FaceTime. All of the methods shown above provide quality screenshot. However, it is best to capture screenshot using Apowersoft Mac Screenshot. This is simply because this program provides other helpful functions aside from taking screenshot, such as an image editor, and an image uploader.

Leave a Comment