We spend all that time taking photos of everything we do. We thought the photos will help to recall the memories of days gone by but only find they are electronically rotted on our hard drive. What a waste! To keep them organized, we can just get creative to make a slideshow from our photo collection with music and watch them at the comfort of our couch to reminisce on special memories. By doing this, we don’t need any advanced photo or video editing skills to make the photo slideshow look great. The below tools will do the job automagically. Simply upload photos and get started.
How to Create a Photo Slideshow with professional tool
Video Converter Studio is a very accessible tool for all experienced and inexperienced users with its simplicity and efficiency. It remains a top tool for creating slideshows when dealing with lots of static photos. All kinds of photo file types are supported to upload to this tool and you can arrange them as you like. There are 65 transition effects to choose from and each effect comes with its own unique style. You can also add background music to individualize the photo slideshow. Here’s a step by step instruction to guide you make a photo slideshow with it.
i
Download and install the software
Download the program by clicking the below button or you can go to its official website to know about it before you determine to use it. After the exe wizard is fully downloaded, install the software to your PC by accepting the terms and conditions.
ii
Import photos to the program
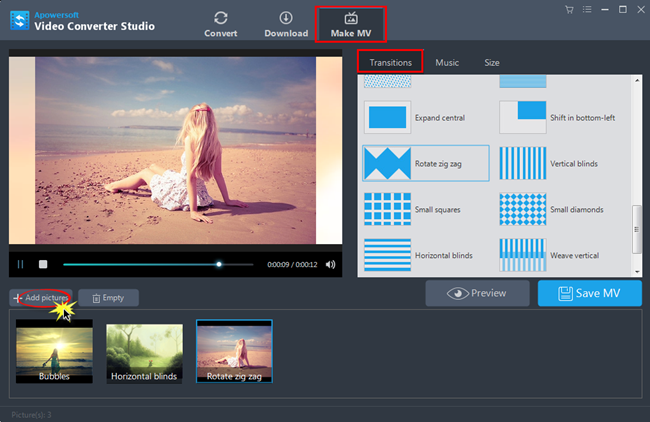
Launch the software, click “Make MV” tab on the top part of the main interface and you’ll be directed to the MV window. Hit “Add Pictures” button to select all images you wish to use and then the photos will be displayed at the photo line. If you are not satisfied with the current sequence of all photos, you are allowed to directly drag the photo to the place you want it in.
iii
Choose transition effects
Each photo will be added different animation effect by default. You can change the effects by clicking the photo that you want to add animation effects and choosing an option you prefer under the “Transitions” on the right side.

iv
Add Background music
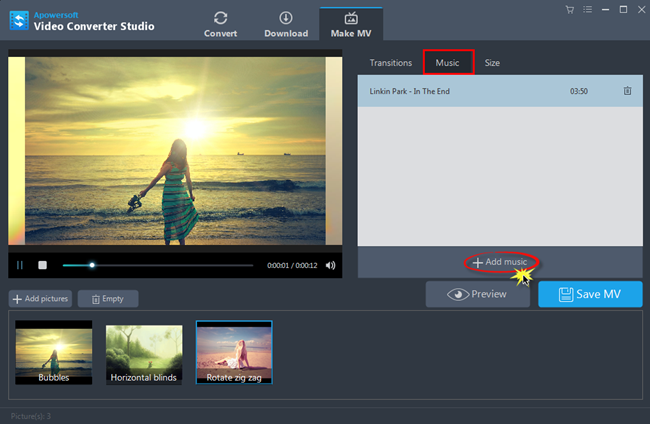
Click the “Music” tab next to “Transition” tab to add music for your photo slideshow. Hit “Add Music” to upload the song you want to use.

v
Set screen size for your slideshow
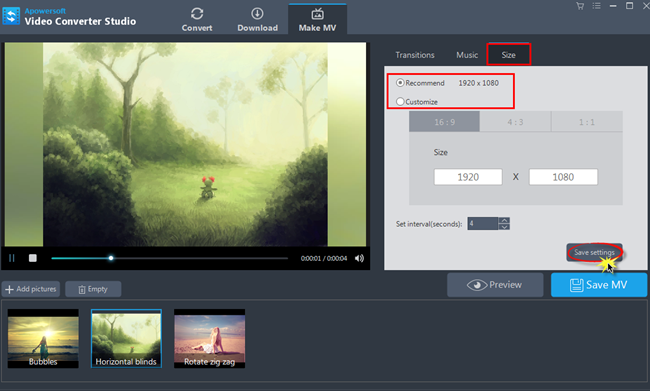
Click “Size” tab and choose your preferred size for your video output. Under this tab, you are able to control the transition time of every photo.

vi
Save the video
Once all settings are done, click “Save Settings” button and then preview the whole slideshow to check out the video you created. Hit “Save MV” if you’re already satisfied with it. The output photo slideshow is output in MP4 format which is the most compatible type with all series of devices and players.
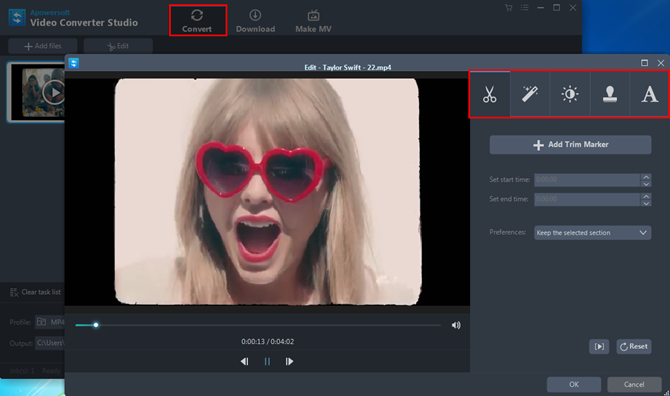
That is the entire steps to create a photo slideshow with Video Converter Studio. Aside from its MV Maker function, this program features three other functions: Video Converter, Video Editor and Video Downloader. You can use it to convert any video saved on your computer to other audio and video formats. The video editing function lets you crop, trim, join, add watermarks and apply effects on video clips. Its built-in video downloader option provides you a great way to download videos from various sites.

5 Free Online Slideshow Creators for Recommendation
There are also other web based applications that you can use for creating slideshows. Here are some recommendations.
1
Roxio PhotoShow
Roxio PhotoShow offers services for both free and paid subscription. Its basic and intuitive interface have users of every level of skills know how to create a photo slideshow with their own photos and video clips. It has various transition, caption styles and stickers that make the slideshow more fun. The drawback is that the free users are only allowed to add up to 24 photos per show and personal music are not supported to use as well.

2
Slide.ly
Slide.ly is a good option to try if you are looking to create a quick slideshow. And it makes a photo slideshow within three simple steps. Add photos from Facebook, Flickr, Instagram, Google, Picasa account or directly from computer. Upload music from huge collection of playlist in Slide.ly, YouTube or one’s own music. Then select effects for the video to make it look more interesting. Note that the slideshow video can only be visible to Slide.ly users. If you wish to publish it in your social website account like Facebook and Twitter, you can only share its link for people to view, like and comment.

3
PhotoSnack
PhotoSnack is a free photo slideshow creator that also lets users upload photos in 6 ways: computer, Facebook, Flickr, Instagram, SmugMug, Photobucket and Google Plus account. It provides 9 ready-made slideshow templates. You can add your own audio file as the background music or pick one from 20 sound tracks on the site for free. This web slideshow maker doesn’t offer transition customization and slideshow download options.

4
Animoto
Animoto is featured with its simpleness in creating a photoslideshow. It is capable of generating slideshow from our images and photos in just a few steps automatically: insert photos, select a stylish template, preview the slideshow video and share it to various websites. However, the video comes with a watermark and it can be removed only if you upgrade to a paid subscription.

5
PicoVico
PicoVico works almost the same as other options. You can choose from the available slideshow themes but you can’t change or personalize how the images would transit to the next one. It only lets you add up to 30 text and music in the video. The best of PicoVico is it allows users to save the video slideshow on their computer or export it to YouTube and Facebook.


Leave a Comment