Computer users today are sometimes being called the sharing generation. Users tend to share everything via Facebook like pictures, foods, songs, etc. In addition, people love sharing computer tricks to others via YouTube or other video streaming websites. Recording screen activity requires using additional third-party software to do this job, which costs a lot in registration, especially for Mac computers. Others are using cameras to record screen, but it’s also a roundabout way with no guarantee for satisfied quality. Fortunately, there are now cheap and free methods to record Mac screen with sound to help you to capture tricks or tutorials that you found in computer. Read on to find out more about these new software products.
How to record your screen and audio on Mac OS
Recording screen activity with audio on your Mac computer has never been easier. You can either use the default player on your Mac system to record a simple video with limits, or switch to a more comprehensive solution – Apowersoft Mac Screen Recorder in the beneath parts.
Method 1: Comprehensive Way – Apowersoft Mac Recorder
The Apowersoft Mac recorder is one of the most functional screen recorders available in the market today. It has the same functionality as the screen recorder of QuickTime X but allows for more customizations in the sound quality. Also, it has an intuitive interface that enables you to grasp this program easily within several glances. Recording your Mac screen with audio has never been so easy within this tool. Here are the basic steps to make it.
1
Download and install the Apowersoft Mac Recorder software. It works with Mac OS X and higher versions. This means that this recording software works for Mac OS X and higher versions as well.

2
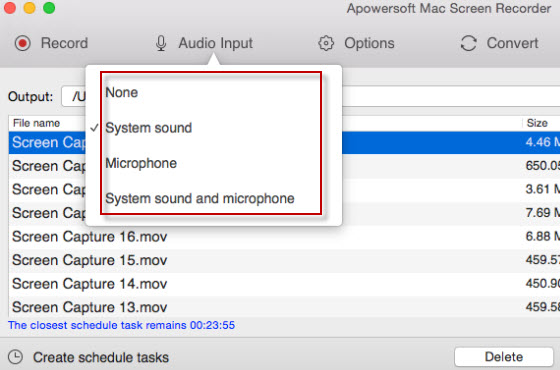
Set up your audio source. You can click on the “Audio Input” option and choose a desired sound source (System sound, microphone or both).

3
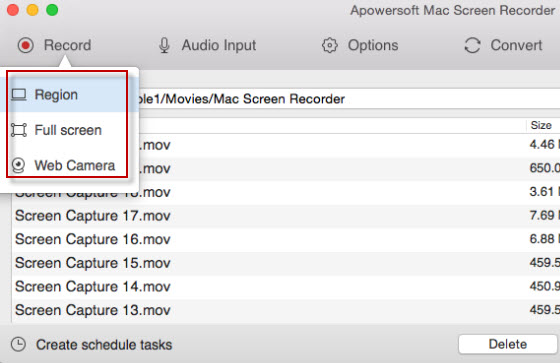
Record the screen activity: To start, simply click on “Record” button then choose a recording mode. You can solely choose to record webcam videos with this tool. If you want to finalize your recording, just click “Stop” on the task tool bar.
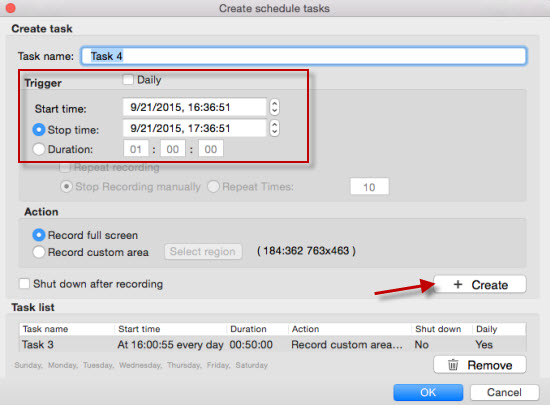
The Apowersoft Mac Recorder also comes with task scheduler to record screen even during your absence. If you want to record an activity on your screen but are unable to be there, you can schedule recording tasks by setting the start time and the duration for recording. In addition, this software also features a built-in converter for turning videos other compatible formats, and it allows for direct publication to YouTube in HD quality.

Besides, the default media player for Mac – QuickTime also has recording function. This feature is very convenient for users to make screencast on Mac screen. You can learn more info from the following part.
Method 2: Simple Way – QuickTime
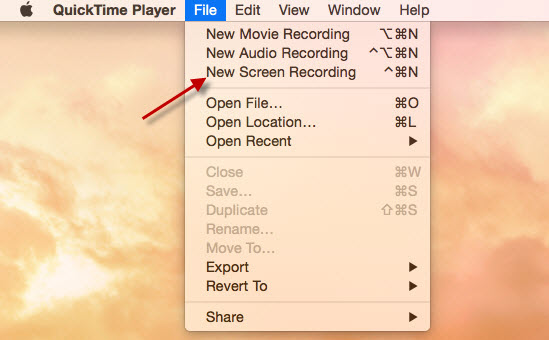
Since the release of Mac OS X, the ability to record Mac screen with audio has been easier due to the added functionality of the QuickTime player. QuickTime X is a pre-installed media player for Mac. With QuickTime, you can simply click the option of the “New Screen Recording” option from the “File” panel and you can record any part of your screen for sharing. It has a surprisingly beneficial function for letting you record just a selected area of the screen.

While QuickTime X provides convenience for Mac OS X users to have a Mac screen recorder with audio, it does have limits to its functionality. QuickTime automatically saves the screen recording to .mov format, which is used for QuickTime and Apple devices as default. However, sending these videos to Windows PCs might be unable to deliver via Internet, publish to social network, incompatible with Windows. In addition, the QuickTime screen recorder option does not allow modifying the sound quality being recorded.
To conclude, we have discussed two ways on how to record screen and audio on Mac OS X. It is easy to see that the Apowersoft Mac Recorder has great advantages over the screen recording function of QuickTime. If you want a fully functional and a complete recording suite, then the Apowersoft Mac Recorder is your best bet. After all, it has successfully combined the functionality and affordability without compromising the quality of your output.

Leave a Comment